This tour builds on what we saw during our tours of HTML and CSS. Be sure to revisit these tours before continuing here. Our tour of HTML showed examples of unstyled web pages, and the CSS tour showed how to make web pages more attractive. In this tour, we learn how a web page can change in content, style, and behavior based on user interaction.
JavaScript originated at Netscape to add dynamic behavior to web pages. Later, Netscape submitted JavaScript to ECMA to maintain the standards of the language. ECMA has ECMAScript as a root language. TypeScript and JavaScript are both child languages of ECMAScript which means neither can do anything which does not exist in ECMAScript. Not all features which exist in ECMAScript must exist in either TypeScript or JavaScript. TypeScript is a compiled language and can compile into JavaScript whereas JavaScript is an interpreted language. Modern web browsers contain a JavaScript interpreter which means we can execute the same JavaScript code in these browsers running in any operating system. This broad presence of the interpreter makes JavaScript a good language for creating dynamic web sites.
There are only two things we need before starting: a text editor to create a web page and a web browser to view it. A good free text editor is Notepad++. A popular browser is Google Chrome. I will be using both tools for our tour, but feel free to use your own favorite tools.
Notepad++: You can download the proper version for your device at the Download page. Just run the setup program accepting all the defaults.
Chrome: Click "Download Chrome" on the Download page to automatically download and install.
This tour will show code examples. These examples have a caption like: Code 1 with some descriptive text and a file name in parentheses. You can copy the examples from this web page and paste into a new file in your text editor, type the same code yourself into your text editor as it appears in the examples, or copy the indicated files in the captions from My Code Examples Code Repository. Feel free to use any method. It is important for the file name to have a html extension. So, make sure your file name ends in html. Go to your folder containing the html file and double-click the file. The file should launch in your web browser.
We can also run JavaScript code within the browser itself. Clicking the F12 key will launch the Developer Tools for the browser. This command works across a variety of browsers including Internet Explorer, Edge, Chrome, Firefox, and others. The developer tools allow you to see the HTML design of the page, related source files for the page, network traffic. Among these tools will be a Console tab where you can enter and run JavaScript commands. These commands only work for the browser session and will disappear when you close the Developer Tools. You still need to save your JavaScript code in a file if you want to use it again. We will explore the Console tool more during our tour.
An Introduction to JavaScript as a Programming Language
Every language has a syntax which describes how to arrange characters into words into meaningful phrases. The syntax of many computer languages can be similar, but there are distinctions among them. There are a few basic commonalities among them all. These items are:
- Declaring a variable
- Assigning a value to the variable
- Testing the value of the variable
- Looping through a range of values for the variable
Think about signing for a world cruise. Before you can buy your ticket, you sign into your cruise account by providing your name and password on the cruise company's website. The cruise company needs to collect this information to check their list of all names and passwords to see if you provided a valid combination of name and password. Behind the scenes, the website creates a variable for name and another for password, assigns the name the user provided to a name variable and the password to a password variable, then loops through each user in the users lists to test if there is a user with the name stored in the name variable with a password stored in the name variable. If there is a match, the website allows the user access to the site or denies access if there is not a match and may even tell the user what was wrong. In this short example, we have seen all four basic commonalities: declare a variable, give the variable a value, loop through a range of values, and test the variable.
Declaring Variables, Assigning Values, and Data Types
Now that we have described a real world scenario, the question is how can we do all these things with JavaScript. Let's start with declaring variables and assigning values to variables. There are three keywords for declaring a variable: var, let, and const (short for constant). The keyword var is the one we will see most often because let and const are recent additions to JavaScript after ECMAScript introduced them in version 6. For now, we will look at var.
JavaScript is a weakly typed language which means variables can hold different types of data. Some languages only allow a variable to hold certain types of data. JavaScript infers the data type based on how we assign values to the variable. Data types in JavaScript are number, string, Boolean, object, function, and undefined.
I am going to give a brief description of each data type and follow up with examples later. Numbers are just what you would expect--any whole number or decimal number. Strings are any text--any combination of letters, punctuation, and numbers. Booleans are true and false values.
Objects are like a combination of variables referring to the same thing. Think of a person. A person has a name and an age. Say person A is Sally and person A's age is 20, and person B is Jack and person B's age is 21. Each person is an object. Sally is one object and Jack is another. Both Jack and Sally objects have common characteristics (name and age) which may have different values.
A function is a collection of JavaScript statements. A statement is a single instruction. Each statement needs to end with a semi-colon (;) character. JavaScript does not force us to use the ending character for each statement and will automatically add it if you don't provide it. However, you run the risk JavaScript may add the ending character in an expected place. Best practice is to always use it. Functions are parts of code which we expect to use multiple times, but we only want to write once. A simplistic function would be one called Add which takes two number variables as input and returns the sum of the two numbers.
Undefined is a little bit different than then other data types as it does not actually represent a variable's value. Rather undefined refers to a variable which does not have a value. If we declare a variable but do not assign it a value, the variable is undefined.
Let's look at variables using our web browser's console window. As I mentioned earlier, I am showing examples using Chrome. I can access Developer Tools by pressing my F12 key. This short cut works on most browsers. If you have trouble finding it, look in your browser's menu for an item like "More Tools" with a sub-item like "Developer Tools" and click that item. Once Developer Tools are available, there will be tabs for several tools. Click on the tab for Console. The Console lets us enter JavaScript code and see the results.
We can enter each statement from Code 1 into the Console window. The results of entering each of these statements is in Figure 1.
	var age = 25;			// data type is number

	var cost = 1.49;		// data type is number

	var name = 'Jack';		// data type is string

	var name = "Jack";		// data type is string

	var age = '25';			// data type is string

	var isMinor = false;	        // data type is boolean

	isMinor = true;			// data type is Boolean

	var x;				// data type is undefined

	var personA = {			// data type is object
			name: 'Jack',
			age: 25
		      };

	function add(x, y) {		// data type is function
		var sum = x + y;
		return sum;
	}

	/* Function add requires two number values as input.
	   Function add returns the sum of the two number inputs.
	*/

	var names = ['jack', 'sally', 'zero'];	// data type is object
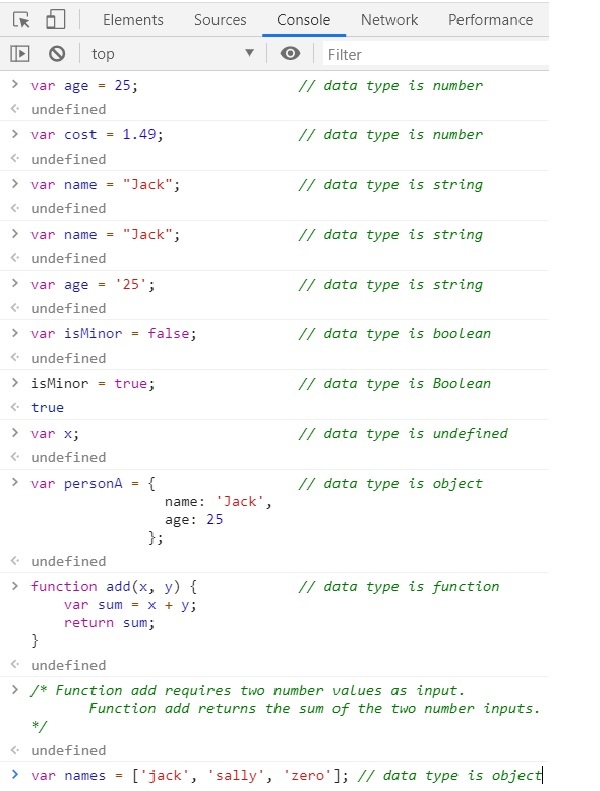
The first thing we notice in Code 1 is how we declare a variable and assign it a value. We use the var keyword along with a unique variable name to declare the variable. We assign a value to the variable by including the equals (=) character and supplying the value and including the semi-colon (;) statement ending character to signify we are done writing the statement. The first two entries declare variables age and cost; the age variable holds a whole number (integer) value of 25, and the cost variable holds a decimal value of 1.48. Next to each statement in Code 1, there is a line of text which identifies the data type of the variable on that line. This text begins with 2 forward slashes (//). The slashes denote a comment. JavaScript does not execute code in a statement. Comments are helpful to include descriptions of what is happening in the code. Also, if we look at Figure 1, then we will see the Console writes "undefined" on each line after we enter a statement. We can disregard this behavior for now as it is not relevant to what we are exploring.
The next 3 entries declare variables name and age. We first declare the variable name and assign the value Jack with single-quotation marks. Next we redeclare the variable name and assign it the value Jack with double-quotation marks. The use of either single or double quotation marks indicates the data type is a string. We can use either form of declaring a string variable value. However, if our string contains an apostrophe (like a single quotation mark, then it will be necessary to declare the variable's value with double-quotation marks so JavaScript. For example, if our value was O'Brien and we assigned the value using single-quotation marks, JavaScript will become confused and declare a syntax error because it does not know how to handle the third single-quotation mark. Also notice that we redeclared the variable age and assigned the value 25 in double-quotation marks. Even though we know 25 is a number, JavaScript thinks it is a string because we enclosed it in quotation marks.
The next two lines deal with boolean data type. On the first line, we declare a boolean named isMinor and set the value to false. We give isMinor a new value of true on the next line. This example serves two purposes. First, we see how to declare a boolean variable and give it a value. Second, we see that we do not have to redeclare a variable to give it a new value; we can just use the variable name and assign a new value to it. There is an exception if we declare isMinor with the const keyword. instead of the var keyword (cost isMinor = false; instead of var isMinor = false;). Remember when I said const is short for constant? Well, if we use the const keyword, then we can set the variable value once and then the variable's value becomes constant. In other words, we cannot reassign a value to a variable declared with const after we set its value. We can assign isMinor to false, but we cannot reassign it to true.
Next, we declare a variable named x. Notice that we did not assign a value to x. We do not have to give variables as soon as we declare them. We can declare a variable now and assign it a value later. When we declare a variable but not assign it a value, the variable is undefined. This example is a demonstration of the undefined data type.
We see an example of an object on our next stop. Objects are representations of real world things and combine a list of properties of that thing. A person has a name and an age. A cruise ship has a name, and an owner, and a country of registration among other things. An object can have one property or many properties. In JavaScript, we set an objects value by setting all of the object properties within curly braces ( {} ). Each property has a name and a value which we separate by a colon (:), and we separate each property by a comma (,). We can refer to the object using the object variable name personA. If we want to get the value of one of personA's properties, we use the object name combined with a period (.) and the property name. We use personA.name to get personA's name value of Jack, and personA.age to the age value of 25.
The function data type is next in the tour. Functions are different than the previous items in not using the var keyword. To declare a function, we use the function keyword instead with a function name followed by input variables in parentheses ( () )and a set of curly braces ( {} ). Also, there is not a requirement to end a function declaration with a semi-colon. It is possible to declare a variable and set the variable's value to a function which allows you to refer to the function by the variable name instead of the function name. In this case, you should use an ending semi-colon like you would for setting the value of any other variable. If we want to provide input to the function, then we include a variable for each input in the parentheses after the function name. Separate each input with a comma. Inputs to functions are not required. If there are no inputs, do not put anything in the parentheses. We do not need to use the var keyword for the inputs; all we need is a name for each input. If we want the function to provide a result, we use the return keyword to provide the result along with the value to output. In the function add example, the function expects 2 inputs and returns a value. The inputs could be any data type or mix of data types. if we use enter add(2,4); in our Console window, the console reports 6 as the result. If we enter add("Hello ", "Cruisers");, the Console reports "Hello Cruisers" as the result. Functions do not have to return values; maybe, they just do something to change the screen. If we do not need to output a value, we can ignore the return statement.
Following the function is a comment describing the function. Earlier we saw the way to add a comment is to preface our comment with two forward slashes. However, here we have comments starting with one forward slash and an asterisk ( /* ) and ending with an asterisk and a forward slash ( */ ). This comment syntax allows us to write a comment over multiple lines when we have longer comments. The use of double forward slashes only allows comments on the same line where we use them. This comment syntax following the function declaration allows us to enter any text we want over any number of lines so long as the comments appear between the two asterisks.
Our last stop in our Code 1 visit is for a special type of object called an array. An array is a list of things such as a list of cruise passenger names, we declare an array using the var keyword with a name. We assign values to an array by enclosing them as a set of values separated by commas with square brackets ( [] ). We can use items of different data types in an array. For example, we could have a list of numbers or a list of names or a list of objects. We can even have a mix of data types in an array. Each item in an array has an integer index value starting with 0. We can use the array name and the index to get the value in the array's index position. For example, names[0]; returns "jack", and names[1]; returns "Sally", and names[2]; returns "zero".
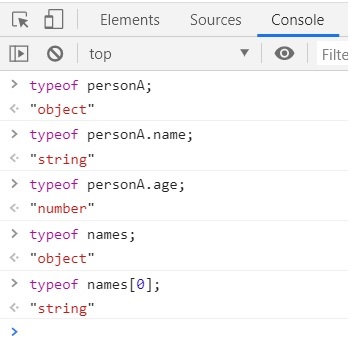
One last thing we see in Code 1 is the comment after each declaration stating the data type of variable. We can use the typeof keyword followed by the name of the data item. Figure 2 shows a few examples of typeof for the object personA and the array names we used in Code 1. We enter typeof personA;or typeof names; into the Console window and see both variables are of object data type. If we enter typeof personA.name;, we see name is of string data type. If we enter typeof personA.age;, we see age is of number data type. Finally, entering typeof names[0];shows the name[0] value "jack" is of string data type. Feel free to experiment with using typeof with the other variables we saw in Code 1, or any new variables you wish to declare.
You may be wondering how we can see the value of a variable. A new keyword phrase we can use is console.log(variable name). If we enter console.log(cost); into the Console, the window will report 1.49 as the value of cost. Similarly, console.log(isMinor); will return the value of true as true is the last value we assigned to isMinor in Code 1. If we did a console.log on one of the two object data type variables, the window will report everything which exists between the curly brace, or square, bracket. For example, console.log(names); reports jack,sally,zero. Of course, we can still get individual parts of an object, or array, like we did when using the typeof keyword. We can enter console.log(personA.name); or console.log(names[2]);, for example, to get the individual values from the objects.
Testing Equality
The boolean data type comes into play when testing variable. If two variables have the same value, it is true that the variables are equal. Conversely, if the two values are not the same, it is false that the variables are equal.
We used a single equals sign ( = ) to assign a value to a variable. We use the equals character for testing equality, but in a slightly different syntax. To make things just a little bit more interesting, there are two ways of testing equality due to the weak data typing nature of JavaScript. We use double equal characters ( == ) to test if two variables have the same value and three equal signs to test if two variables have the same value and are of the same data type. If we want to test if two values are not equal, then we can use an exclamation point ( ! ) in place of the first equals character in the equality test.
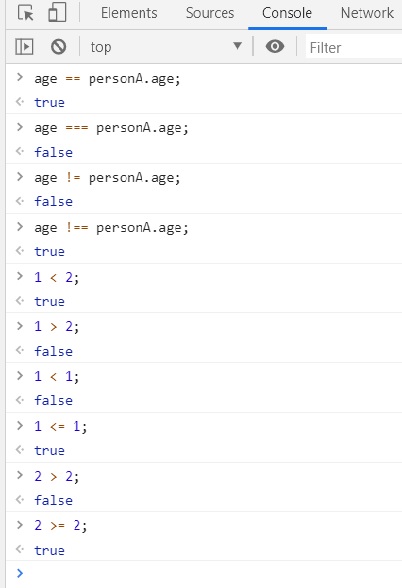
Figure 3 shows the results of testing the equality of various value comparisons. We start by using the statements from Code 1 and shod in Figure 1. The JavaScript expressions for equality are == and ===, and JavaScript expressions for non-equality testing are != and !==. First, let's enter age == personA.age; in the Console. We noticed earlier that both variables have values which look like the number 25, but the data type of age is string as a result of the value being in quotation marks. JavaScript will look at the two values and see if they are similar or if it can convert one data type to the other. In the comparison of age and personA.age, JavaScript says the value of age looks like a number. Since the value of age (25) looks like the value of personA.age (25), JavaScript reports this comparison as equal and reports the result as true in the Console window. However, if we enter age === personA.age; in the Console, JavaScript will report false in the Console. Even though the values look the same, the data types are different. Since the value and the data type is not the same, they variables are not equal. We can also look at these tests using the not equals notations. If we enter age != personA.age; in the Console, the Console reports false because it is a false statement that 25 is not equal to 25. Entering age !== personA.age; will report true because the value the values are the same, but the data types are not. Since the data types are not the same, it is a true statement that the two values are not equal.
Sometimes, we want to test a range of values instead of an exact value. JavaScript expressions contains < and <= for testing if one value is less than, or less than or equal, to another value. Similarly, JavaScript provides >, and >= to test if one value is greater, or greater than or equal, to another value. Figure 3 shows some less than tests and some greater than tests. It is true that 1 is less than 2 (1 < 2;), but false that 1 is greater than 2 (1 > 2;). We also know it is false that 1 is less than itself (1 < 1;) but true that 1 is less than or equal to 1 (1 <= 1;). Analogously, 2 is not greater than 2 (2 > 2;), but is greater than or equal to 2 (2 >= 2;).
Often, we make certain decisions if something is true, or alternate decisions if something is false. These decisions could have multiple steps. For instance, we would only allow an adult (someone whose age is at least 18) to buy a cruise ticket. Also, we only want to sell a liquor package on the cruise to someone of legal drinking age (age is at least 21). JavaScript uses a if...else statement for such scenarios. Code 2 shows an example of using the if...else statement. Figure 5 shows the use of this code in the Browser Console.
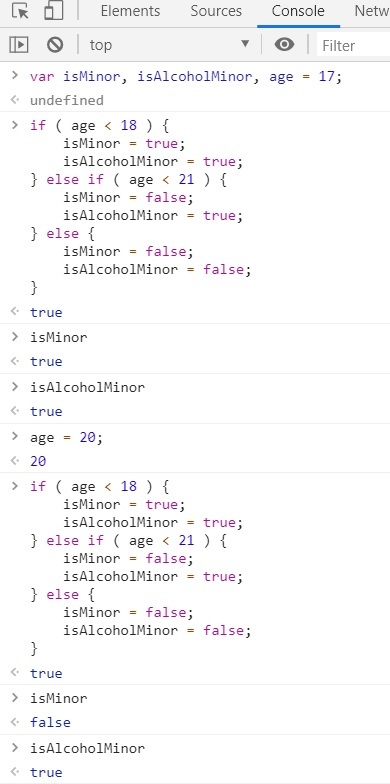
Code 1 begins by setting three variables: isMinor to tell us if the person is too young to buy a ticket, isAlcoholMinor to tell us if the person is too young to buy alcohol, and age which we set to 17 for our initial test. This example combines two tests--one for isMinor and one for isAlcoholMinor. The if...else statement begins with an equality test. If the equality test evaluates to true, then we perform the actions inside the first set of curly braces. If the fires equality check evaluates as false, then we ignore the first set of statements and move to the else part. The else part can contain another equality check like we do in Code 1.
The first test is if the age is less than 18. Someone below 18 is both a minor and an alcohol minor. Since the age is 17, the first test is true which means we set both isMinor and isAlcoholMinor to true. Since this statement is true, JavaScript does not need to continue with any other parts of the if...else statement. We enter isMinor; and isAlcoholMinor; to see both values are indeed false.
Next, we change the age to 20 by entering age = 20; and re-entering our if...then statement. Since age is now 20, then the age < 18 equality test is false which causes us to move to the first else part. This else has an equality test. Since age which has a value of 20 is less than 21, we run the statements in the second statement block. These statements set isMinor to false and isAlcoholMinor to true. We enter isMinor; and isAlcoholMinor; to see these values are es expected. JavaScript ignores the final else block because the second test was true. If we had set the age to 21, then JavaScript would have skipped the statement blocks with the first two equality test and set both isMinor and isAlcoholMinor to false.
	var isMinor, isAlcoholMinor, age = 17;

	if ( age < 18 ) {
		isMinor = true;
		isAlcoholMinor = true;
	} else if ( age < 21 ) {
		isMinor = false;
		isAlcoholMinor = true;
	} else {
		isMinor = false;
		isAlcoholMinor = false;
	}
Looping over Values
When someone books our world cruise, we collect a list of passengers in the booking. Initially, we do not know if the person is traveling alone or with others. There may be times when we need to use this list of passengers. Setting a variable for everybody in the group is not practical because we will not know how many variables we will need. An array becomes practical in this case; we can create one array variable which holds the passenger names. Looping through the array allows us to access each passenger's name.
Code 3 shows an example of how we can loop over an array of passengers. This code will not run in Console so I am not going to show it in Console. We will need to run it from a script associated with a web page. We will see how to get JavaScript to run as script in a web page later. Let's talk about the for statement from a code perspective for now.
First, we declare passengers as an array and populate the array with three passengers: Jack, Sally, and Zero. Next, we loop over the passengers array with the for statement. This statement contains three parts.
Keep in mind we can access each entry in an array with an integer (aka index) and the index starts at 0. So, the first part of the for statements declares and index variable set to 0. We will use this variable to access each passenger in the array. The next part of the for statement controls how many times we are going to loop.
There is a property of arrays called length which indicates the number of items in the array. We want to loop for every passenger, and we have 3 passengers. So, we want to loop 3 times. So long as the value of index is less than 3, we want to loop again. We do not want to loop less or equal 3 because we have 3 passengers and we start counting with 0. Three passengers starting at 0 means we want to use index values 0, 1, and 2.
The last part of the for statement changes the value of index every time we loop so we can access the next passenger. The ++ is a JavaScript command which adds 1 to the variable. In this case, index++ is the same as index + 1.
Every time we loop, JavaScript will execute the alert function. JavaScript's alert function is a pop up window with and OK button and displays the message passed into the alert function. Here, alert will show the passenger's name.
When JavaScript runs this code, it will start with index at 0 and say 0 is less than 3 (count of passengers and display "Jack" which is the name of the passenger in passengers[0]. Upon return to the for line, index becomes 1 (0 + 1) and JavaScript says 1 is less than 3 and displays "Sally" which is the name of the passenger in passengers[1]. Upon return to the for line, index become 2 (1 + 1) and JavaScript says 2 is less than 3 and displays "Zero" which is the name of the passengers in passengers[2]. Upon return to the for line, index becomes 3 (2 + 1) and JavaScript says 3 is not less than 3 and will no longer continue with the looping. JavaScript will skip out of the loop and execute any code after the for statement.
	var passengers = ["Jack", "Sally", "Zero"];

	for (var index = 0; index < passengers.length; index++) {
		alert(passengers[index]);
	}
Looking at JavaScript in the browser Console gave us a chance to focus on learning the basics of the language. We learned about data types, setting variables, comparing variable values, and looking at a range of related values. This part of the tour was informative and introduced us to enough of the language so we can learn more about it and other ways of doing some of the same things we have seen. The big question now is how does JavaScript work with a web page. Let's explore this concept.
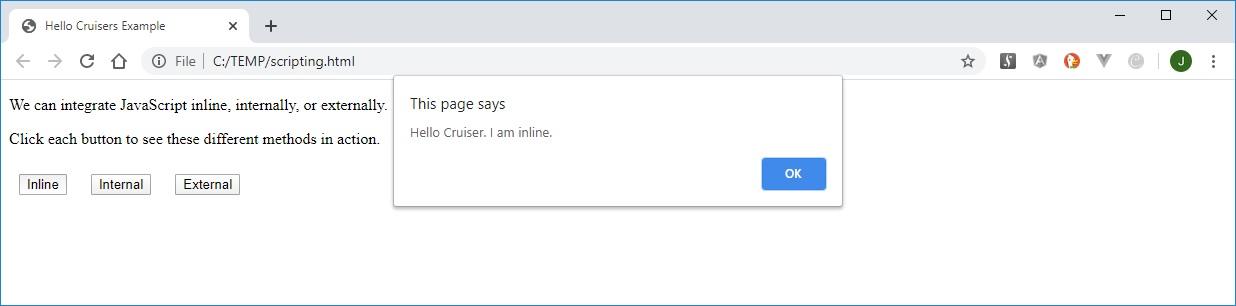
Like how we learned to integrate CSS into a web page during the CSS Tour, there are 3 ways to integrate JavaScript: inline, internal, in external file. Code 4a is for a basic web page showing how to use each method, and Code 4b shows the related external JavaScript code. Figure 5 shows the web page and the result of clicking the Internal button.
Code 4a shows 3 buttons and each button has an onClick attribute. The onClick attribute means the onClick event and defines what should happen on the event of the user clicking the button. Events describe user interactions such as pressing a key, changing an entry in a text box, picking an item from a list of items, checking a check box, and many more. We must provide an action to perform when clicking the button. This action is the JavaScript code.
The Inline button has an alert statement. Clicking the Inline button executes the alert statement. The alert window pops up, as we see in Figure 5, and says "Welcome Cruiser. I am Inline." This demonstration is simple. However, in the last section when we saw how to loop, we could have several statements. Putting all these statements inline with the button could get very messy to read the HTML code. We can get away from this messiness by using internal scripting.
For the Inline button, we provide a function (internalHello) to execute when we click the Internal button. The web page needs to find the internalHello method and finds it in the script node just after the body node. The internalHello function says to show an alert with the message "Hello Cruiser. I am Internal." The result is like what we see in Figure 5. The only difference is the text in the alert. The benefit is we can more complicated code, like the looping of passenger names, here and keep the JavaScript code separate from the HTML code. We can one, or many, functions in the script node.
Maybe we have long JavaScript functions, or many functions, or the same code we want to use on several web pages. In these situations, we could move our JavaScript code to a separate file. Code 4b shows the contents of the scripting.js file. In this simple example, we only have one function which looks like the internalHello function for the Internal button. The external file contains the externalHello function which shows an alert with the "Hello Cruiser. I am External." message. Note that we normally name external JavaScript files with a js extension (i.e. scripting.js). We can include the external file to the HTML file through a scripting node. The second scripting node (the one below the one containing the internalHello function) shows how we connect the HTML and JS files. We make this connection using the src (think source) attribute which describes where to find the external JavaScript file. The src attribute says to look for a file called scripting.js which is in the same folder as the scripting.html file.
	<!DOCTYPE html>
	<html>
		<head>
			<meta charset="utf-8">
			<title>Hello Cruisers Example</title>
		</head>
		<body>
			<p>
				We can integrate JavaScript inline, internally, or externally.
			</p>
			<p>
				Click each button to see these different methods in action.
			</p>
			<button onClick="alert('Hello Cruiser. I am inline.');">Inline</button>
			<button onClick="internalHello()">Internal</button>
			<button onClick="externalHello()">External</button>
		</body>
		<script>
			function internalHello() {
				alert('Hello Cruiser. I am internal.');
			}
		</script>
		<script src=".\scripting.js"></script>
		<style>
			button {
				margin: 10px;
			}
		</style>

	</html>
	function externalHello () {
		alert('Hello Cruiser. I am External.');
	}
Like adding styling to our HTML, we have 3 ways of adding JavaScript to our web page. The best practice is to use the external method. Now that we have seen how to integrate JavaScript into a web page and a very basic example of allowing a user to interact with the page, we will explore how we can use JavaScript to alter our page and to respond to user input in the next stop on our tour.
Now is the time to bring HTML, CSS, and JavaScript together to demonstrate an interactive web page. In this case, we are going to look at a web page where a traveler is going on a world cruise and needs to provide names of his fellow travelers and to provide payment by credit card before cruising. Before our traveler can submit payment, he must provide at least 1 name and the name must be at least 3 characters long. When our traveler has finished adding names, we need a valid credit card number. Once we have all the needed information, then we can give our cruiser a bon voyage. Figure 6 shows our initial page.
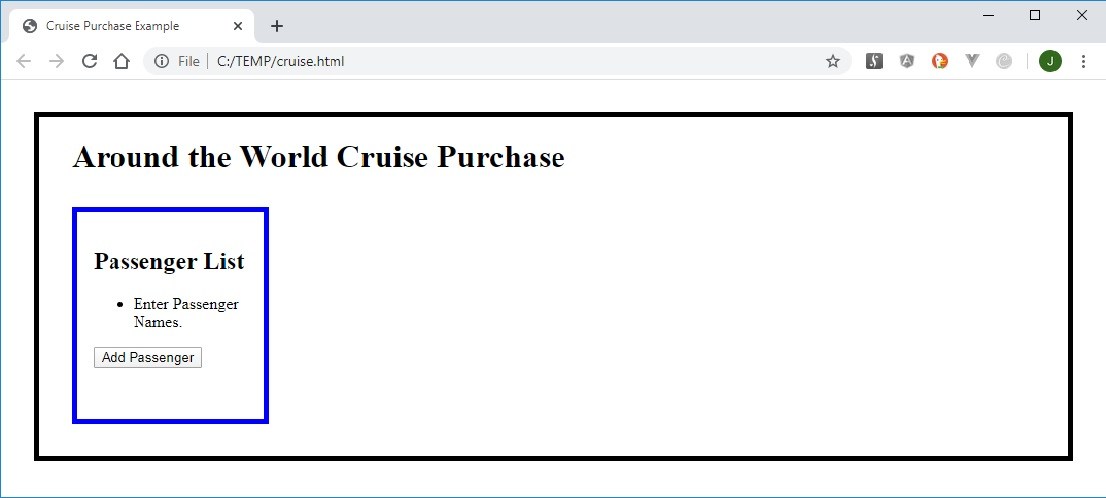
If we look at our page in Figure 6 and compare it to the code in Code 5, we notice there are several things in the HTML which we do not see. These "missing" items are the Done Adding Passengers button and the whole payment section. A review of the CSS in Code 6 shows some things are hidden, and the payment div node is set to not display. Logically, it makes sense to not show things as available when we are not ready to see them. If we showed the payment section, there is a possibility of the user trying to make a payment before adding passengers to the booking. So, we control what the user can see and do to make sure we have the needed information before moving to the next step.
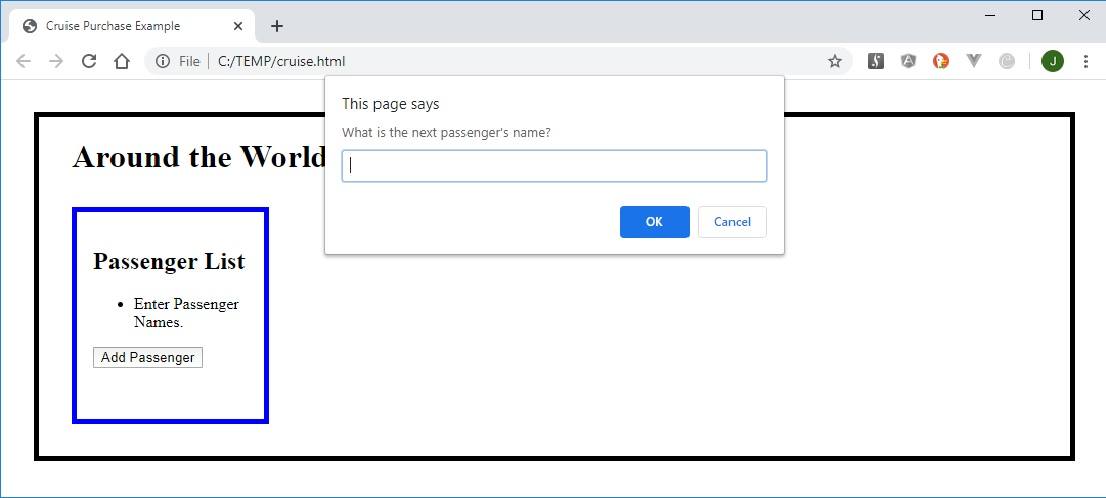
The first thing we need is the list of passenger names. We see a list saying we need to add passengers and a button we can click to add their names. The Add Passengers button (id addPass) runs the addPassenger function when we click the button. The first thing the addPassenger function does is prompt for the passenger name. The prompt statement is like the alert statement except it allows a user to input something. We capture the user input in the name variable. Figure 7 shows the prompt for passenger name.
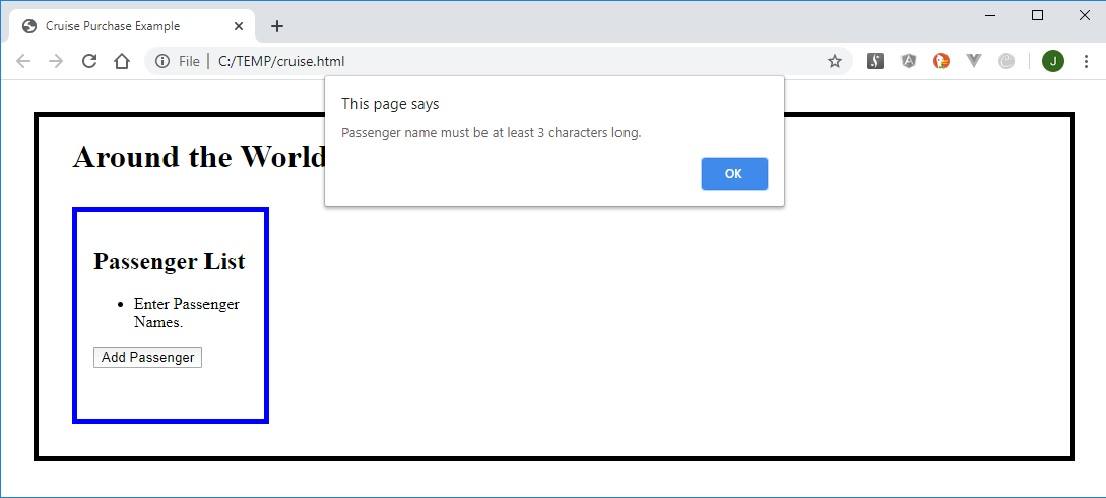
Once we have the user input for name, we pass the value to the validateName function. This function gets the length of the name. Since we have said we want to make sure the name is at least 3 characters long, we test if the name value's length is less than 3. If the length is less than 3, then we alert the user and return false; we return true if the length is at least 3. Not all functions need to return a value, but we can return a value if the initial call to the function needs one. Since we are trying to determine if the name is valid, then we do need to know. If the name is not valid, we do not add the name to the passenger and action stops. The addPassenger function continues if the name was valid. Figure 8 shows the alert message about the passenger name length when the name is not valid. After clicking the alert's OK button, the system returns to the main page.
If the name is valid, we remove the "Add Passenger Name" item from the list and add the passenger's name to the list and show the "No More Passengers" button. We can see this effect in Figure 9 where we have added a passenger with the name Jack. This part of the addPassenger function shows our first example of modifying a web page. Notice the use of the document keyword throughout the JavaScript file. The document refers to the HTML document. Anywhere we see the document keyword, we know we are looking at the elements (or nodes) of the HTML code.
We also see the use of the getElementByID keyword. This keyword looks for the HTML element with an id attribute having the same value. We could also look for HTML elements with the getElementByClassName keyword which matches the value of class attributes or the with the getElementByTagNmae keyword which matches on the HTML tag name. These selectors are like CSS selectors in that they will find and work on all the elements the function finds. We are only using the getElementByID in our example.
The first thing to do is to remove the "Add Passenger Name" list item if it exists. We look for an element with an ID value of NoPassengers. If we find a node with this ID, then we look for the list which is the ul element with the "PassengerList" ID value. The removeChild statement allows us to remove the "Add Passenger Name" list item as this item is a child of the ul node. Think of a family tree. Each family node has 2 parents and 1 or more children. The ul (unordered list) is the parent and the li nodes are the children of the ul element. So, if we want to remove a li element, then we need to remove the child of the ul element. Of course, the ul element is not the only one which can be a parent. There is a parent-child relationship between any set of elements when there are elements inside of other elements. Look at Code 5. You are seeing sibling elements each time you see a set of elements indented together. The element containing the siblings is the parent.
Now that we have deleted the default list item, we need to add the name the user entered to the list. We start by creating an element node named li because we need to add a list item. The createElement statement does the creation. We assign the passenger name to this element by using the innerHTML statement. Finally, we find the list again by using the getElementByID statement and use the addChild statement to add our new li element.
We finish up the addPassenger function by adding 1 to our passenger count, and by showing the "Done Adding Passengers" button. Since we have at least one passenger in the list, it makes sense to show this button. We show the button by changing the style of the element to make the visibility value visible instead of hidden. The style statement allows JavaScript to modify the style of the web page. Figure 9 shows "Jack" in the passenger list and shows the "Done Adding Passengers" button.
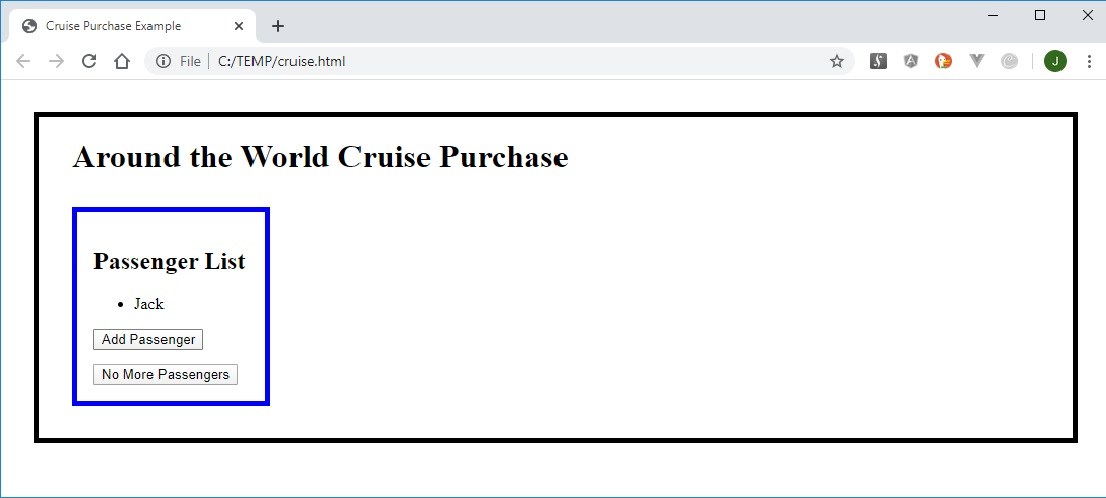
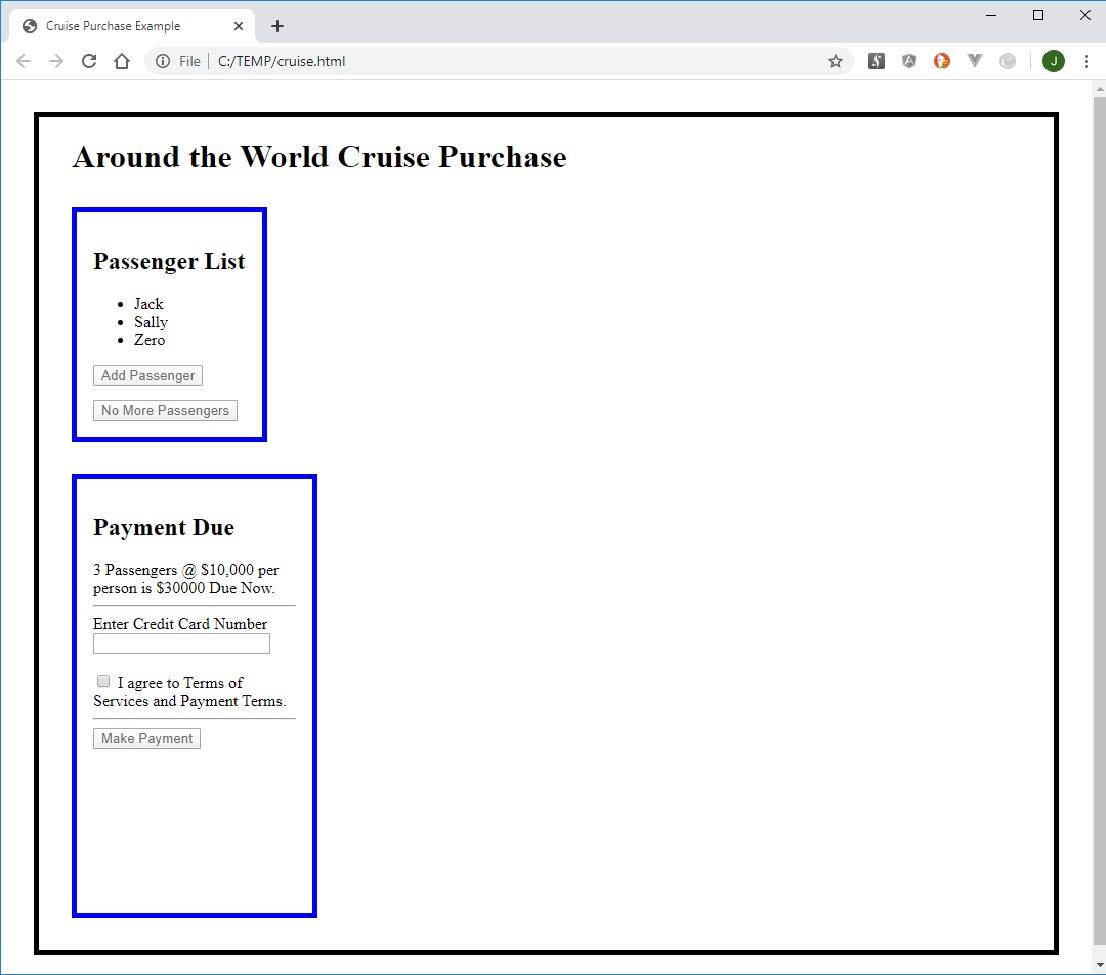
Figure 10 shows us what happens after we have added 3 passengers (Jack, Sally, Zero) and clicked the "Done Adding Passengers" button. Clicking this button caused the button and the "Add Passengers" button to become disabled--clicking the buttons is no longer possible. Also, the Payment Due section came into view and indicates 3 passengers signed up for the cruise, the cruise price is $10,000 per passenger resulting in payment due of $30,000. Even though payment is due, the Make Payment button remains disabled. Some user interaction (the credit card number and the check box) is apparently required. We will talk about payment processing in a bit. Right now, we will focus on what happened by clicking the "Done Adding Passengers" button.
The HTML code in Code 5 shows the onClick event of the button calls the addingDone function. This function gets the two buttons and sets their disabled attribute to true. Then, the function calls the showPayment method. The showPayment method declares totalDue using let instead of var and assigns the value by multiplying passenger count by cost per passenger. We declare the total variable to form the remaining text of the total due line. JavaScript uses the innerHTML statement to display the passenger count and the total due. Finally, we use the style statement to change the style of the Payment Due section to display on screen.
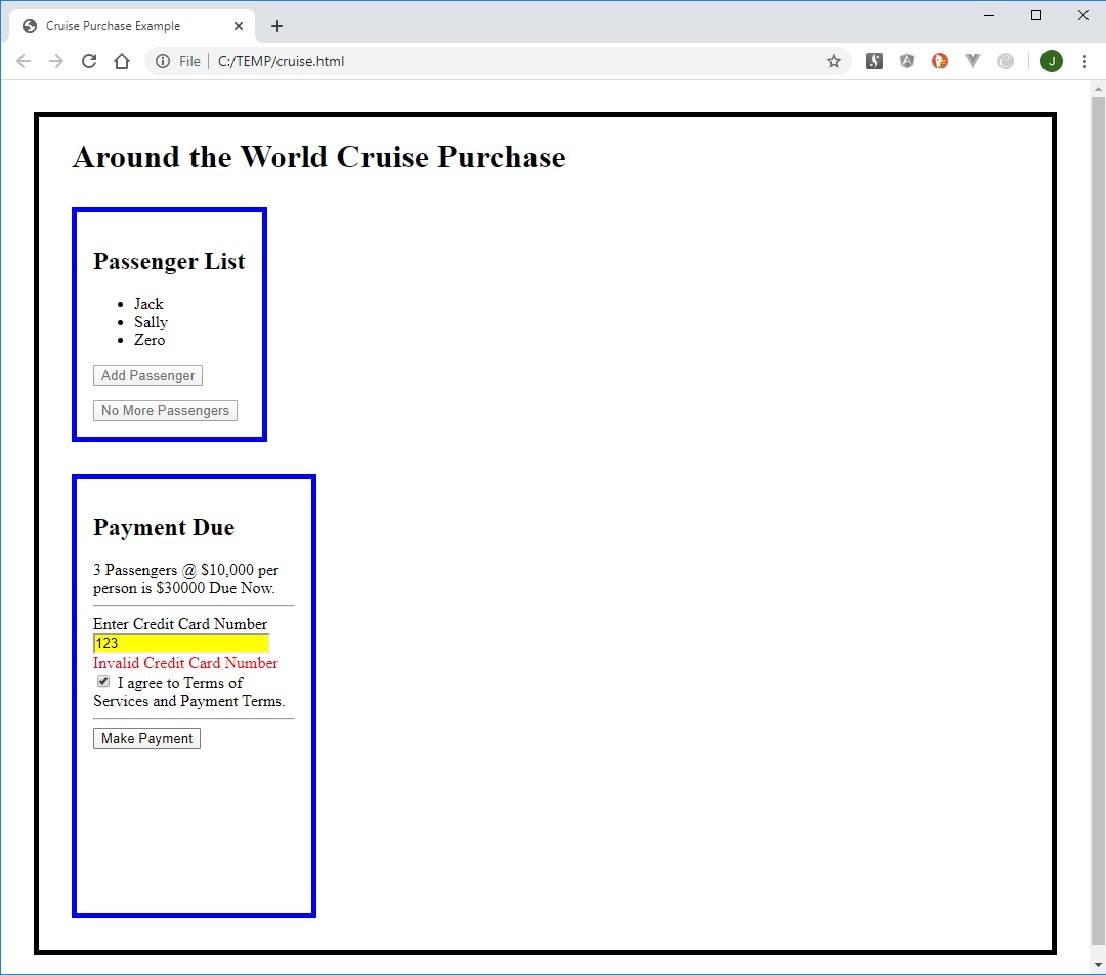
We can see what happens if we do not enter valid payment information in Figure 11. The Accept Terms check box is checked. The credit card number field contains "123" as an entry but has a yellow background and the red "Invalid Credit Card" message is on screen. The Make Payment button is enabled. Code 5 shows we call the termsChecked function when we check the Terms check box. This function finds the check box element and gets the value of its checked attribute. If the checked value is true, the code finds the Make Payments button and removes the disabled attribute from it which makes it available for clicking. A checked value of false puts the disabled attribute back on the "Make Payments" method.
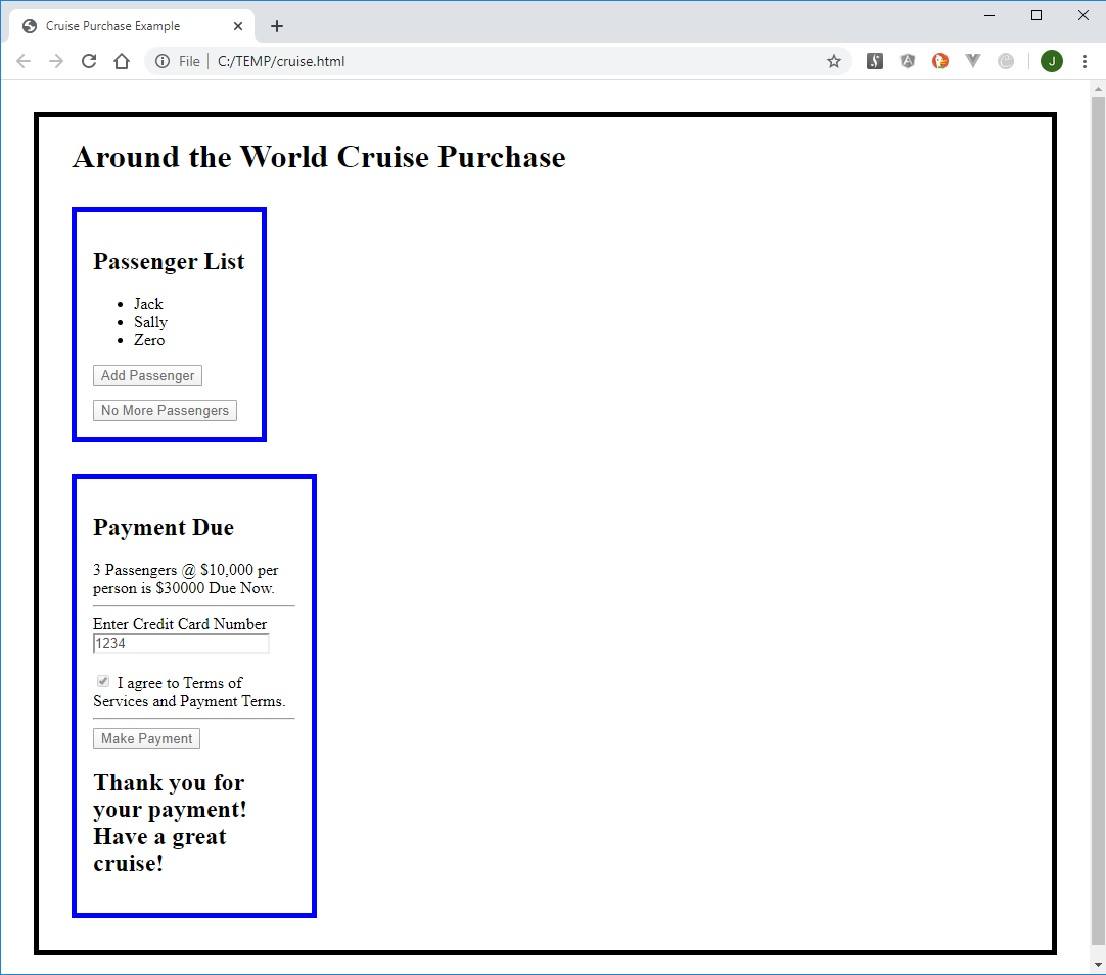
If the user clicks the "Make Payments" button, then the onClick method runs the submitPayment function. This function calls the isValidPayment method which gets the value in the Credit Card Number fields (ID = ccNumber). For simplicity, we say a valid Credit Card Number is 1234. In the real world, we would have code which would validate actual credit card numbers, but this goal is beyond the scope of our current tour. If the entered credit card number is 1234, the method returns true; otherwise, the method returns false.
The returned value from isValidPayment determines the next action. I An invalid credit card number shows the "Invalid Credit Card" message and changes the Credit Card Number background color to yellow. The message and the coloring help the user identify where the problem is.
If the number was valid, we set the Credit Card Number background color back to white in case it was still yellow, hide the invalid credit card message if present, disable the "Make Payments" button and the Terms check box, and show the "Thank You" message. We see this result in Figure 12.
	<!DOCTYPE html>
	<html>
		<head>
			<meta charset="utf-8">
			<title>Cruise Purchase Example</title>
			<script src=".\cruise.js"></script>
			<link rel="stylesheet" href="cruise.css">
		</head>
		<body>
			<h1>Around the World Cruise Purchase</h1>
			<div id="passengers">
				<h2>Passenger List</h2>
				<ul id="passengerList">
					<li id="NoPassengers">Enter Passenger Names.</li>
				</ul>
				<button id="addPass" onClick="addPassenger()">Add Passenger</button>
				<button id="addDone" onClick="addingDone()">No More Passengers</button>
			</div>
			<div id="payment">
				<h2>Payment Due</h2>
				<div id="charges">
					<label id="passengerCount"></label>
					<label>@ $10,000 per person</label>
					<label id="total"></label>
					<hr/>
				</div>
				<div id="creditCard">
					<label>Enter Credit Card Number</label>
					<input id="ccNumber" type="text"></input>
					<label id="invalidCC">Invalid Credit Card Number</label>
				</div>
				<div>
					<input type="checkbox" id="yesToTerms" name="terms" onClick="termsChecked()">
					<label for="yesToTerms"> I agree to Terms of Services and Payment Terms.</label>
					<hr/>
				</div>
				<button id="makePayment" onClick="submitPayment()">Make Payment</button>
				<br/>
				<h2 id="thankYou">Thank you for your payment! Have a great cruise!</h2>

			</div>
		</body>
	</html>
	body {
		margin: 2em;
		border: 5px solid black;
	}

	h1 {
		padding-left: 1em;
	}

	#thankYou {
		visibility: hidden;
	}

	#passengers {
		margin: 2em;
		border: 5px solid blue;
		padding: 1em;
		width: 15%;
	}

	#addDone {
		margin-top: 1em;
		visibility: hidden;
	}

	#payment {
		margin: 2em;
		border: 5px solid blue;
		padding: 1em;
		width: 20%;
		display: none;
	}

	#invalidCC {
		visibility: hidden;
	}
	var passengerCount = 0;

	function addPassenger() {
		var name = '';
		var listNode = document.createElement("li");
		name = prompt("What is the next passenger's name?", "");

		if(validateName(name) === false) {
			return false;
		} else {
			var none = document.getElementById("NoPassengers");
			if (none !== null) {document.getElementById("passengerList").removeChild(none);}
			listNode.innerHTML = name;
			passengerCount++;
			document.getElementById("passengerList").appendChild(listNode);
			document.getElementById("addDone").style = "visibility:visible";
			document.getElementById("makePayment").setAttribute("disabled", "true");
		}
	}

	function validateName(name) {
		if (name === null) {return false;} else if (name.length < 3) {
			alert("Passenger name must be at least 3 characters long.");
			return  false;
		} else {return true;}
	}

	function addingDone() {
		document.getElementById("addPass").disabled = true;
		document.getElementById("addDone").disabled = true;
		showPayment();
	}

	function showPayment() {
		let totalDue = passengerCount * 10000;
		let total = " is $" + totalDue + " Due Now.";
		document.getElementById("payment").style = "display: block";
		document.getElementById("passengerCount").innerHTML = passengerCount + " Passengers";
		document.getElementById("total").innerHTML = total;
	}

	function termsChecked() {
		if (document.getElementById("yesToTerms").checked === true) {
			document.getElementById("makePayment").removeAttribute("disabled");
		} else {document.getElementById("makePayment") .setAttribute("disabled", "true");}
	}

	function submitPayment() {
		if (isValidPayment() === true) {
			document.getElementById("ccNumber").style = "background:white";
			document.getElementById("ccNumber").setAttribute("disabled", "true");
			document.getElementById("yesToTerms").setAttribute("disabled", "true");
			document.getElementById("makePayment").setAttribute("disabled", "true");
			document.getElementById("invalidCC").style = "visibility:hidden;color:red;";
			document.getElementById("thankYou").style = "visibility:visible";
		} else {
			document.getElementById("ccNumber").style = "background:yellow";
			document.getElementById("invalidCC").style = "visibility: visible;color:red;";
		}
	}

	function isValidPayment() {if (document.getElementById("ccNumber").value === "1234") {return true;} else {return false;}}
This exercise has showed how JavaScript can bring a web page to life. JavaScript allows the user to interact with the web page by providing input, validates the user input, and alerts the user of problems, Further, JavaScript can alter what appears on the web page and can control the styling of the page. We have seen enough in this exercise to appreciate the benefit of JavaScript in web development and to prepare to learn more about it later.
This tour covered a lot of ground. We began by learning about JavaScript as a programming language including declaring and setting variables, how to compare things, and how to loop them. Accessing and using the Console browser tool helped us to see JavaScript code in action. Next, we learned how to integrate JavaScript into a web page. Finally, we saw how JavaScript allows interaction between a user and a web page. There was introduction to more JavaScript statements and syntax along the way. An explanation of every part of JavaScript was beyond the scope of this tour. However, we have seen enough to understand the basics of the language and to how use it so we can be ready to learn more. Feel free to visit the following sites to learn more.
- MDN has basic, intermediate, and advanced tutorials
- W3 Schools lists a complete JavaScript reference section. A benefit here is the Try It functionality which lets you modify the examples and see the result of the change. Although there is some disagreement on W3 Schools being true to official standards, I find the Try It examples helpful in providing immediate feedback when you are learning something new. There are many JavaScript related features and topics accessible from here as well.
We have reached the end of our Web Fundamentals tours. These tours covered the basics of creating a web page, styling the page, and bringing the page to life. I hope you found them informative, interesting, and helpful. Feel free to experiment on your own with what we have learned and continue with my referrals to other sites to learn more. Happy Travels.